Use the Save as shortcut in Excel by pressing F12 or Ctrl + S. You can also reach the function through the File Tab or Quick Access Toolbar.
Press the Ctrl + S shortcut to display the ‘Save as’ dialogue box. Once the file is saved, press the F12 function key to save the file again in the selected location.
Before we dive in, remember to check our list of Excel Shortcuts to speed up your work.
Windows
Mac
Today’s article will show you how to use the Save As Shortcut in Excel in various ways. For example, use shortcut keys or add the function to the Quick Access Toolbar. Furthermore, create a new tab on the Ribbon or create a custom Save As Shortcut using VBA.
Differences between the “Save” and “Save As” Shortcut
Both commands are essential under the Excel file menu, and understanding when to use each can help you manage your files more effectively. These functions allow you to store your work, help ensure the integrity of your original data, and control where and how your files are saved. While they may seem similar, they serve different purposes.
Differences between the Save and Save As shortcuts:
- “Save As” for Exporting or Creating New File Versions: The Save As function is useful when exporting your worksheet into a different file format. It also lets you create a new version of an existing file. For example, you can use this command if you’re working on a .xlsx file and need to share it as a .csv. Choose the desired format from the dropdown menu. This preserves the original file while creating a new one for specific purposes. You can also use it to share data in simpler formats or prepare it for another program.
- “Save” for Overwriting Existing Data: The Save command is best for making changes to an existing file. It updates the current document with your latest edits. The new content replaces the old file without creating a new one. This is helpful when you are continuously working on the same file. However, be aware that it overwrites the previous version. If you need to keep past versions, it’s better to use Save As instead.
- “Save As” for Better Control over File Location and Format: Another advantage of Save As is its flexibility. You can decide where to store the file and which format to use. For instance, you may want to save it in a shared drive for collaboration or on your local machine for personal use. The command gives you control over both the file’s location and format. This ensures that your work is archived to the best of your needs. It also offers a broader range of file formats than Save, making it great for specialized tasks.
How to apply a keyboard shortcut to Save As
- Make sure the Excel file is ready to be saved.
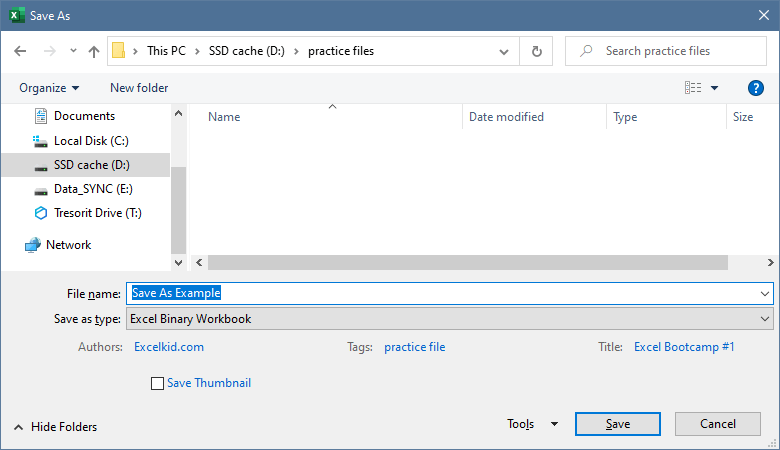
- Press F12 to open the Save As dialog box.
- In the Save As window, fill in the necessary details.
- Click Save to complete the process.

After pressing the shortcut, a new window will appear. Now you can add the following data:
- Filename: the name of the Workbook
- Type: Choose the file type. In the example, we use Excel binary format.
- Authors: You can add multiple authors
- Tags: Add a Tag
Pin the Shortcut to the Quick Access Toolbar
The Quick Access Toolbar (QAT) is a great tool for keeping frequently used commands within easy reach, helping you work faster and more efficiently. Adding the “Save As” function to the QAT allows you to access it with a single click instead of navigating through the Ribbon each time.
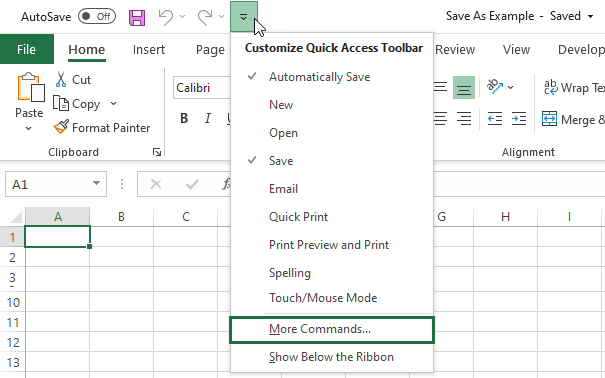
Locate the Quick Access Toolbar (QAT) above the Ribbon, typically at the top-left corner of your Excel window. This small toolbar can be customized to include the commands you use most often. Click on the drop-down arrow next to the QAT to open a menu with a few options. To fully customize the toolbar, click “More Commands” at the bottom of the list.

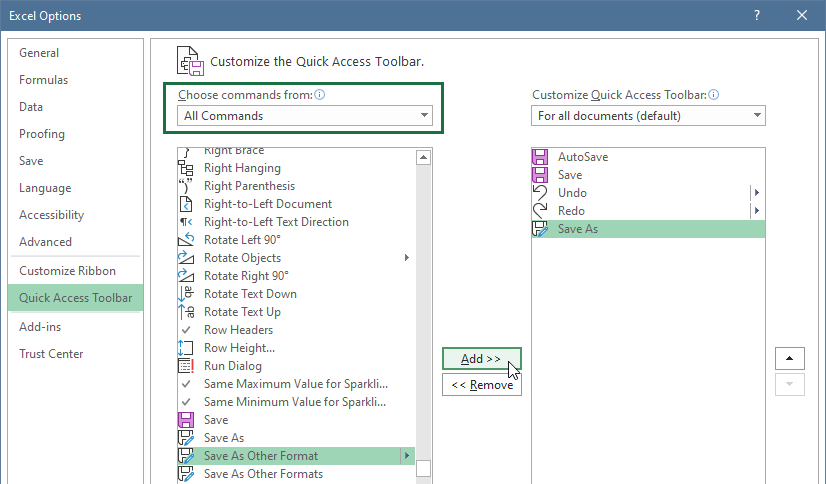
You’ll see a list of commands in the Excel Options dialog box. From the “Choose commands from” drop-down menu, select “All Commands” to view every available option. Find and select the “Save As” command from the list. Once selected, click the “Add >>” button to add it to your Quick Access Toolbar.

After adding the command, click OK to close the dialog box and apply the changes.

The function will now be permanently available on your QAT, making it quicker to access whenever needed.
Create a “Save as” Group on the Ribbon
As mentioned in the previous example, placing the shortcut to the QAT is easy. What if you want to use the Shortcut as a “Group command” on the Ribbon? There is an easy way to do that!
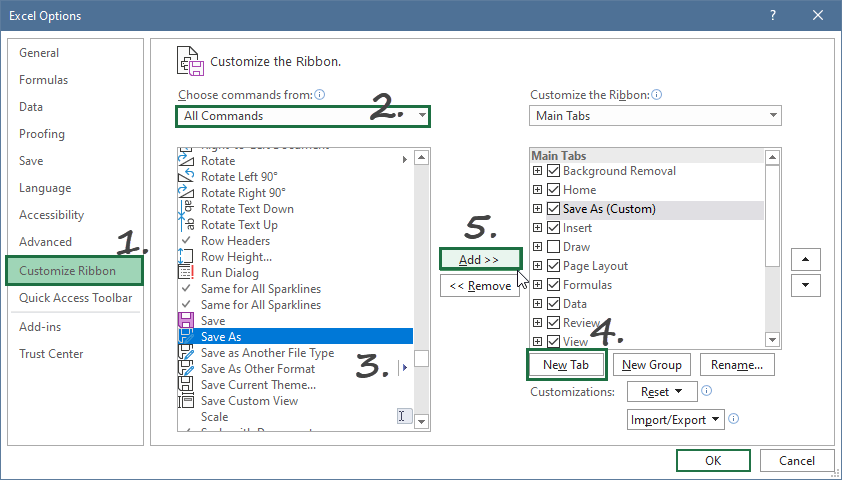
Click File > Options to reach Excel Options. Select Customize Ribbon. Pick the ‘Save As’ command from the list. Create a New Tab and rename it to Save As. Select the recently inserted Tab and click the add button. Finally, click OK to close the Excel Options dialog box.

After clicking OK, the new tab will appear on the Ribbon.

Apply macro to create a Save As Shortcut Trigger
Macros are a powerful feature in Excel that allows you to automate repetitive tasks by recording actions or writing custom code. In this case, you can create a macro that triggers the Save As function with a simple keyboard shortcut. This can be useful if you frequently save your work in different formats or create new file versions.

- Open the VBA Editor: To begin, press Alt + F11 to open the Visual Basic for Applications (VBA) Editor. This editor is where you can write and manage macros for Excel. If you want this macro to be available in all your Excel files, make sure you add it to your Personal.xlsb workbook, which stores macros that are accessible across all Excel documents.
- Insert a New Module: In the VBA Editor, find your PERSONAL.The XLSB project is on the left-side panel (the Project Explorer). Right-click on the Modules folder and select Insert > Module. This creates a new space where you can write your macro code.
- Write the “Save As” Macro: This code instructs Excel to trigger the Save As dialog for the currently active workbook whenever this macro is executed.
- Save the Macro: Once you’ve written the macro, press Ctrl + S to save your Personal.xlsb workbook. This ensures that your macro will be available the next time you open Excel.
- Assign a Keyboard Shortcut: To make the macro even more efficient, assign it to a custom keyboard shortcut. Press Alt + F8 to open the Macro dialog, select your SaveAs macro and click Options. From here, you can assign a keyboard shortcut (e.g., Ctrl + Shift + S) for quick access.
Workaround with Shared Files
When working on shared Excel workbooks, it’s important to have a system that allows multiple users to work collaboratively without overwriting each other’s changes. Excel’s file-sharing feature helps ensure the original file remains untouched, making it ideal for teamwork. However, in many cases, team members need to apply their custom calculations or modifications without altering the original file.
A workaround is to use a custom Save As process to maintain the integrity of the main file while still allowing others to apply their changes. By doing so, each user can save a personal version of the file with their changes, leaving the shared file intact for everyone else.
If you have minimal knowledge of VBA (Visual Basic for Applications), you can automate this process. A simple VBA macro can help each team member save a version of the file under their username and timestamp, ensuring that everyone’s changes are documented in their files and the main file remains untouched.
Sub CustomSave()
Dim fName, Tstamp As String
fName = Application.UserName & " - "
Tstamp = Format(CStr(Now), "yyyy-mm-dd hh-mm-ss")
ActiveWorkbook.SaveAs Filename:=fName & Tstamp
End Sub
The macro begins by capturing the username of the person working on the file. Then, it generates a timestamp using the current date and time, formatted as yyyy-mm-dd hh-mm-ss. Finally, the macro combines the username and timestamp to create a unique filename and saves the workbook under that name using the Save As function.
This ensures that every user gets a unique file version, making it easy to track who made changes and when. The original shared file remains untouched, which is helpful when multiple users work on a shared project.
Final thoughts
We hope today’s guide on Save As Shortcut in Excel was useful. Choose your preferred method: use the F12 shortcut and place the command to QAT or Ribbon. We’ve just introduced VBA code snippets to manage the shared Workbooks topic.
If you want to learn more about shortcuts, read our favorite articles below:
